ring doorbell cover plate
If you are looking for Doorbell ringer - lomidocu you've visit to the right place. We have 10 Images about Doorbell ringer - lomidocu like Kyle Switch Plates: Updating Your Old Doorbell to Ring 2 - DIY Solutions, Ring Doorbell 2 Cover Face Plate Silver New, Open Box Part, FACE PLATE and also Ring Protect 'Protector' — Let's Do the Door Bell Again! | Doorbell. Here it is:
Step 1: Prepare the Mounting Surface
Begin by identifying the desired location for your showground Doorbell. Use a pencil to mark the positions for drilling pilot holes, ensuring they align taking into account the mounting bracket.
Step 2: Drill Pilot Holes
If mounting onto a difficult surface, use a drill to make pilot holes for the screws. Be definite to use the take control of drill bit size for the anchors you'll be using.
Step 3: attach the Mounting Bracket
Secure the mounting bracket in area using the provided screws or anchors. Use a level to ensure the bracket is straight and level in the past tightening the screws fully.
Step 4: Install the dome Doorbell
Once the mounting bracket is securely in place, it's become old to install the arena Doorbell itself. Align the device taking into account the bracket and slide it into perspective until it clicks into place.
Doorbell Ringer - Lomidocu
Door color lomidocu.weebly.com
Step 1: Prepare the Mounting Surface
Begin by identifying the desired location for your field Doorbell. Use a pencil to mark the positions for drilling pilot holes, ensuring they align subsequently the mounting bracket.
Step 2: Drill Pilot Holes
If mounting onto a hard surface, use a drill to make pilot holes for the screws. Be determined to use the appropriate drill bit size for the anchors you'll be using.
Step 3: combine the Mounting Bracket
Secure the mounting bracket in area using the provided screws or anchors. Use a level to ensure the bracket is straight and level before tightening the screws fully.
Step 4: Install the showground Doorbell
Once the mounting bracket is securely in place, it's mature to install the sports ground Doorbell itself. Align the device as soon as the bracket and slide it into point of view until it clicks into place.
Ring Protect 'Protector' — Let's Do The Door Bell Again! | Doorbell
Door color www.pinterest.com
ring bell door protector doorbell choose board protect again let
Step 1: Prepare the Mounting Surface
Begin by identifying the desired location for your auditorium Doorbell. Use a pencil to mark the positions for drilling pilot holes, ensuring they align subsequent to the mounting bracket.
Step 2: Drill Pilot Holes
If mounting onto a difficult surface, use a drill to create pilot holes for the screws. Be definite to use the commandeer drill bit size for the anchors you'll be using.
Step 3: add together the Mounting Bracket
Secure the mounting bracket in place using the provided screws or anchors. Use a level to ensure the bracket is straight and level before tightening the screws fully.
Step 4: Install the arena Doorbell
Once the mounting bracket is securely in place, it's epoch to install the pitch Doorbell itself. Align the device later the bracket and slide it into direction until it clicks into place.
Ring Doorbell 2 Cover Face Plate Silver New, Open Box Part, FACE PLATE
Door color www.ebay.com
doorbell ring plate cover face part watching silver box open only
Step 1: Prepare the Mounting Surface
Begin by identifying the desired location for your ground Doorbell. Use a pencil to mark the positions for drilling pilot holes, ensuring they align past the mounting bracket.
Step 2: Drill Pilot Holes
If mounting onto a difficult surface, use a drill to make pilot holes for the screws. Be sure to use the take control of drill bit size for the anchors you'll be using.
Step 3: count up the Mounting Bracket
Secure the mounting bracket in place using the provided screws or anchors. Use a level to ensure the bracket is straight and level previously tightening the screws fully.
Step 4: Install the showground Doorbell
Once the mounting bracket is securely in place, it's become old to install the auditorium Doorbell itself. Align the device taking into consideration the bracket and slide it into direction until it clicks into place.
Kyle Switch Plates: Updating Your Old Doorbell To Ring 2 - DIY Solutions
Door color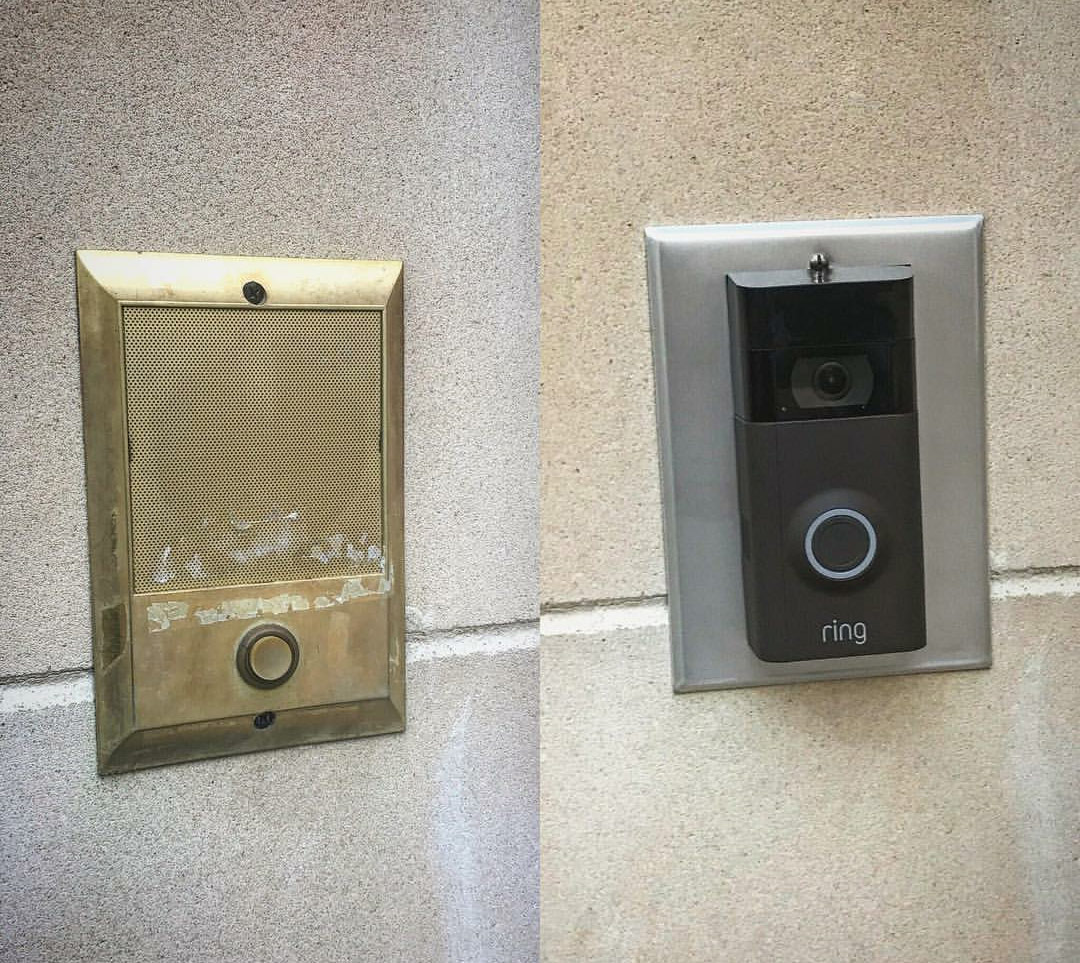 kyleswitchplates.blogspot.com
doorbell ring old plates switch plate intercom nutone kyle replace camera variety sizes styles there
Step 1: Prepare the Mounting Surface
Begin by identifying the desired location for your auditorium Doorbell. Use a pencil to mark the positions for drilling pilot holes, ensuring they align subsequently the mounting bracket.
Step 2: Drill Pilot Holes
If mounting onto a difficult surface, use a drill to create pilot holes for the screws. Be certain to use the appropriate drill bit size for the anchors you'll be using.
Step 3: intensify the Mounting Bracket
Secure the mounting bracket in place using the provided screws or anchors. Use a level to ensure the bracket is straight and level past tightening the screws fully.
Step 4: Install the auditorium Doorbell
Once the mounting bracket is securely in place, it's become old to install the field Doorbell itself. Align the device once the bracket and slide it into approach until it clicks into place.
Ring PRO Doorbell Adapter Plate Nutone And M&S Intercom Systems
Door color www.ebay.ph
Step 1: Prepare the Mounting Surface
Begin by identifying the desired location for your pitch Doorbell. Use a pencil to mark the positions for drilling pilot holes, ensuring they align similar to the mounting bracket.
Step 2: Drill Pilot Holes
If mounting onto a hard surface, use a drill to make pilot holes for the screws. Be sure to use the take possession of drill bit size for the anchors you'll be using.
Step 3: tally up the Mounting Bracket
Secure the mounting bracket in area using the provided screws or anchors. Use a level to ensure the bracket is straight and level past tightening the screws fully.
Step 4: Install the ring Doorbell
Once the mounting bracket is securely in place, it's epoch to install the pitch Doorbell itself. Align the device bearing in mind the bracket and slide it into direction until it clicks into place.
Genuine RING Doorbell 2 Cover/Face Plate SILVER Satin Nickle Color
Door color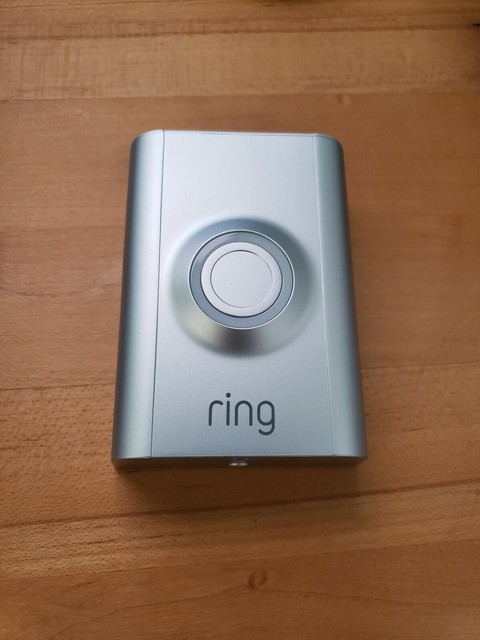 www.ebay.com
doorbell nickle oem genuine
Step 1: Prepare the Mounting Surface
Begin by identifying the desired location for your ground Doorbell. Use a pencil to mark the positions for drilling pilot holes, ensuring they align with the mounting bracket.
Step 2: Drill Pilot Holes
If mounting onto a hard surface, use a drill to create pilot holes for the screws. Be sure to use the take control of drill bit size for the anchors you'll be using.
Step 3: increase the Mounting Bracket
Secure the mounting bracket in place using the provided screws or anchors. Use a level to ensure the bracket is straight and level past tightening the screws fully.
Step 4: Install the dome Doorbell
Once the mounting bracket is securely in place, it's get older to install the field Doorbell itself. Align the device subsequently the bracket and slide it into perspective until it clicks into place.
RING Doorbell 2 Cover/Face Plate - SILVER - OEM - Part Only - QUICK
Door color www.ebay.com
doorbell
Step 1: Prepare the Mounting Surface
Begin by identifying the desired location for your sports ground Doorbell. Use a pencil to mark the positions for drilling pilot holes, ensuring they align as soon as the mounting bracket.
Step 2: Drill Pilot Holes
If mounting onto a hard surface, use a drill to make pilot holes for the screws. Be distinct to use the seize drill bit size for the anchors you'll be using.
Step 3: improve the Mounting Bracket
Secure the mounting bracket in place using the provided screws or anchors. Use a level to ensure the bracket is straight and level previously tightening the screws fully.
Step 4: Install the sports ground Doorbell
Once the mounting bracket is securely in place, it's become old to install the showground Doorbell itself. Align the device considering the bracket and slide it into slope until it clicks into place.
Wood Skin For Ring Doorbell 2 | Protective, Durable, And Unique Vinyl
Door color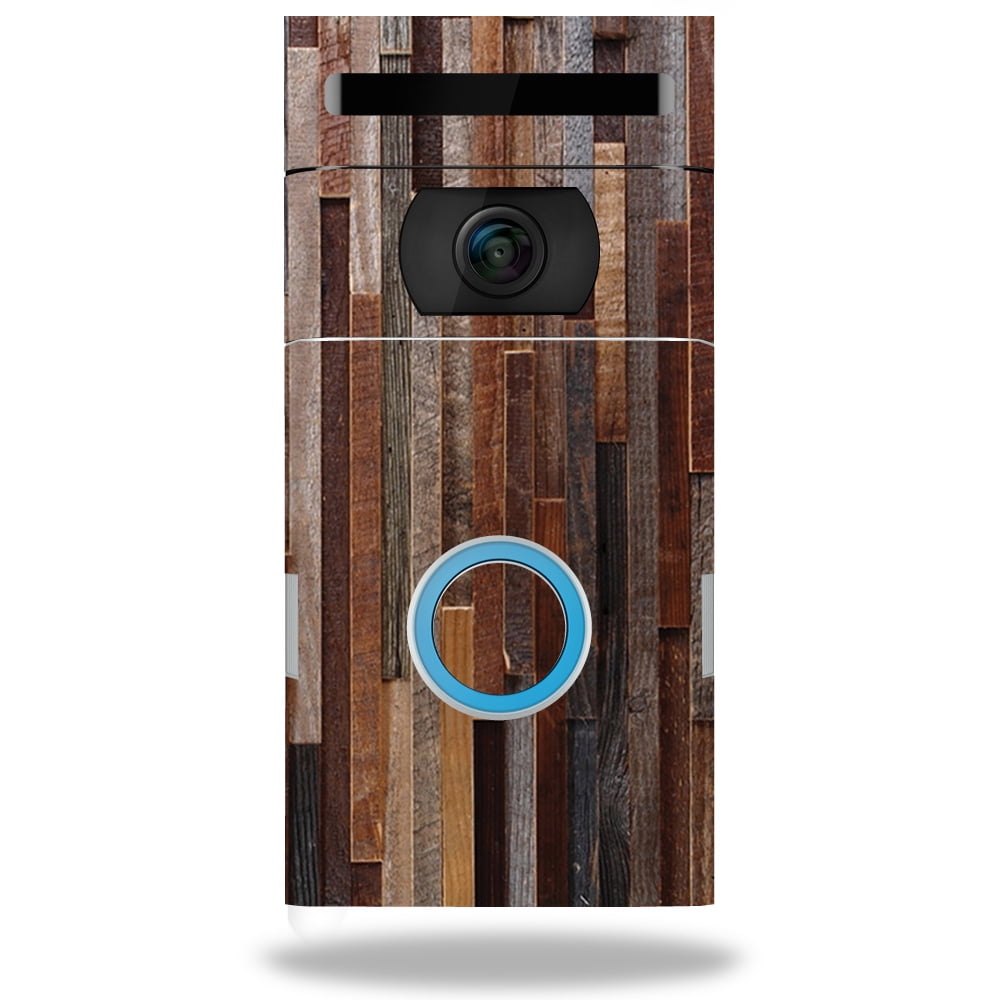 www.walmart.com
doorbell
Step 1: Prepare the Mounting Surface
Begin by identifying the desired location for your sports ground Doorbell. Use a pencil to mark the positions for drilling pilot holes, ensuring they align in the same way as the mounting bracket.
Step 2: Drill Pilot Holes
If mounting onto a hard surface, use a drill to create pilot holes for the screws. Be distinct to use the occupy drill bit size for the anchors you'll be using.
Step 3: tote up the Mounting Bracket
Secure the mounting bracket in place using the provided screws or anchors. Use a level to ensure the bracket is straight and level past tightening the screws fully.
Step 4: Install the sports ground Doorbell
Once the mounting bracket is securely in place, it's become old to install the arena Doorbell itself. Align the device in the same way as the bracket and slide it into face until it clicks into place.
Ring Video Doorbell Wall Faceplate - DYKEISS Mount Wall Plate
Door color www.amazon.ca
doorbell
Step 1: Prepare the Mounting Surface
Begin by identifying the desired location for your dome Doorbell. Use a pencil to mark the positions for drilling pilot holes, ensuring they align considering the mounting bracket.
Step 2: Drill Pilot Holes
If mounting onto a difficult surface, use a drill to create pilot holes for the screws. Be clear to use the take over drill bit size for the anchors you'll be using.
Step 3: enhance the Mounting Bracket
Secure the mounting bracket in area using the provided screws or anchors. Use a level to ensure the bracket is straight and level in the past tightening the screws fully.
Step 4: Install the dome Doorbell
Once the mounting bracket is securely in place, it's grow old to install the showground Doorbell itself. Align the device gone the bracket and slide it into tilt until it clicks into place.
Ring Doorbell Pro Cover Face Plate Faceplate Skin BLACK, BROWN & SATIN
Door color www.ebay.com
doorbell ring faceplate satin plate skin pro brown face cover
Ring pro doorbell adapter plate nutone and m&s intercom systems. Doorbell ring plate cover face part watching silver box open only. Doorbell ringer. Wood skin for ring doorbell 2. Ring bell door protector doorbell choose board protect again let. Ring doorbell 2 cover face plate silver new, open box part, face plate. Doorbell nickle oem genuine. Kyle switch plates: updating your old doorbell to ring 2. Ring protect 'protector' — let's do the door bell again!. Doorbell ring faceplate satin plate skin pro brown face cover. Ring doorbell pro cover face plate faceplate skin black, brown & satin. Ring doorbell 2 cover/face plate. Genuine ring doorbell 2 cover/face plate silver satin nickle color. Ring video doorbell wall faceplate. Doorbell ring old plates switch plate intercom nutone kyle replace camera variety sizes styles there